Are you ready to whip up a treat that’ll make everyone at your next gathering go “wow”? Say hello to Caramel Peanut Ritz Cracker Treats—the ultimate combo of sweet, salty, crunchy, and gooey. These treats aren’t just snacks; they’re little bites of joy that’ll have your taste buds dancing. Whether you’re hosting a party, craving a late-night snack, or just looking to try something new, these treats deliver in every way possible. And guess what? They’re super easy to make! No fancy equipment, no chef-level skills—just some basic ingredients and a little time in the kitchen.
But you know what’s really great about them? They’re versatile. You can serve them at birthdays, picnics, or even as a holiday dessert. Want to hear a fun fact? I made these for my niece’s birthday party last summer, and they disappeared faster than any other dessert on the table! I saw one kid going back for his fourth piece. Trust me, these little guys are that good.
Let’s get started by learning what makes these treats so irresistible and how you can bring them to life in your own kitchen.
Table of Contents
Introduction to Caramel Peanut Ritz Cracker Treats
What’s not to love about caramel? It’s rich, buttery, and sweet with just the right amount of melt-in-your-mouth goodness. Now, mix that with the savory crispiness of a Ritz cracker and the nutty crunch of peanuts. Sounds amazing, right? Think of it as a delicious mash-up between your favorite candy bar and an elevated version of peanut brittle. These treats are proof that opposites not only attract—they absolutely belong together!
Feeling intimidated about working with caramel? Don’t be! Creating these is more straightforward than you’d expect. By the time you’ve finished this guide, you’ll feel like a caramel-making master. Plus, I’m going to share tips, tricks, and troubleshooting advice so you can avoid any kitchen disasters along the way. If you stumble, don’t worry—happens to the best of us. The end result? Totally worth it.
Before heading into the steps, the first step to success is gathering your ingredients. After all, every masterpiece starts with the perfect tools, right?
Ingredients You’ll Need
Here’s the beauty of these treats—you don’t need a long list of complicated ingredients to make magic happen. With just a handful of pantry staples, you’ll be all set!
Must-Haves
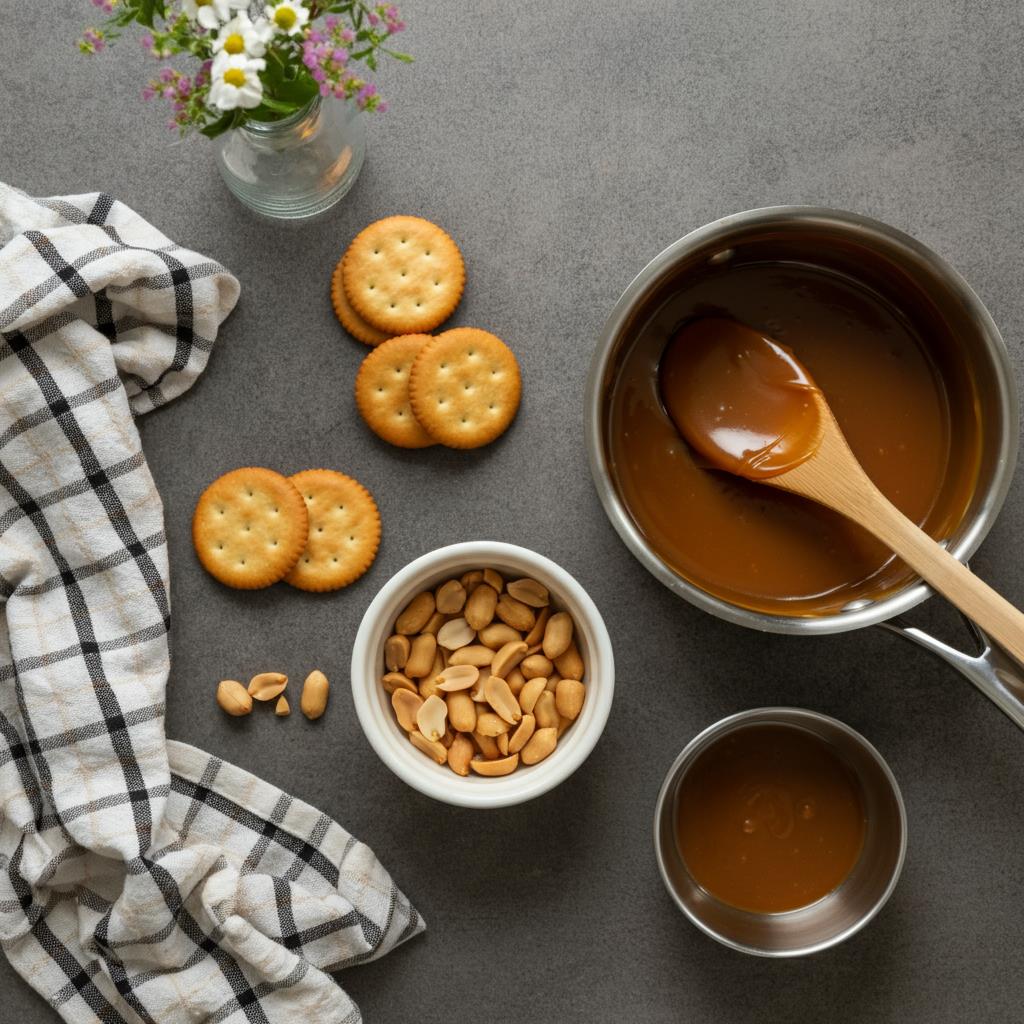
- 1 (14 oz) can of sweetened condensed milk
This is where all that velvety, melt-in-your-mouth sweetness comes from. Think of it as the foundation of your caramel. - 1/3 cup butter
Butter is like the secret sauce in caramel—it adds richness and that oh-so-smooth texture. - 1/3 cup brown sugar
Want your caramel to have that deep, cozy molasses flavor? This is the magic ingredient. It’s also key to getting that golden-brown hue. - 3 tablespoons milk
Milk makes sure your caramel doesn’t get overly thick. Runny caramel? No thanks. This balances it out perfectly. - 1 teaspoon vanilla extract
Just a splash, but trust me, it’s a game-changer! Vanilla ups the flavor and rounds out all that sweetness. It’s literally the cherry on top. - 1 cup roughly chopped peanuts
Crunch factor = unlocked. Peanuts not only add texture but infuse the caramel with their nutty flavor. Not a peanut fan? I’ve got alternatives coming up next. - 1-2 sleeves of Ritz crackers
Here’s the unsung hero of this recipe. Salty, crispy, and oh-so snackable. These crackers are the perfect canvas for your sweet and sticky topping.
Optional Substitutions
Got guests with peanut allergies or just want to switch things up? No worries! You can easily mix and match ingredients to suit everyone’s tastes.
- No Peanuts? No Problem! Sub in almonds, pecans, or even crunchy sunflower seeds. You’ll still get that satisfying crunch.
- Gluten-Free Options: Use gluten-free crackers as a base. There are so many great options out there now; you’ll hardly notice the difference.
- Veggie-Friendly Version: Swap regular butter with plant-based butter or margarine. Easy peasy!
Here’s a pro tip for success before we head into prep work—make sure all your ingredients are measured and ready to go BEFORE you start cooking. Caramel-making requires some quick moves, so having everything on hand will save you from scrambling.
“Good caramel is like confidence—it’s all about timing and balance. Once you master it, the results are magical.” – My grandma’s kitchen wisdom
Step-by-Step Instructions
Alright, now that you’ve got your ingredients lined up, it’s time to roll up your sleeves and create some goodness! Don’t worry—I’ll walk you through every step, with a few helpful hacks sprinkled along the way. You’ve got this.
Step 1: Prepare Your Workspace
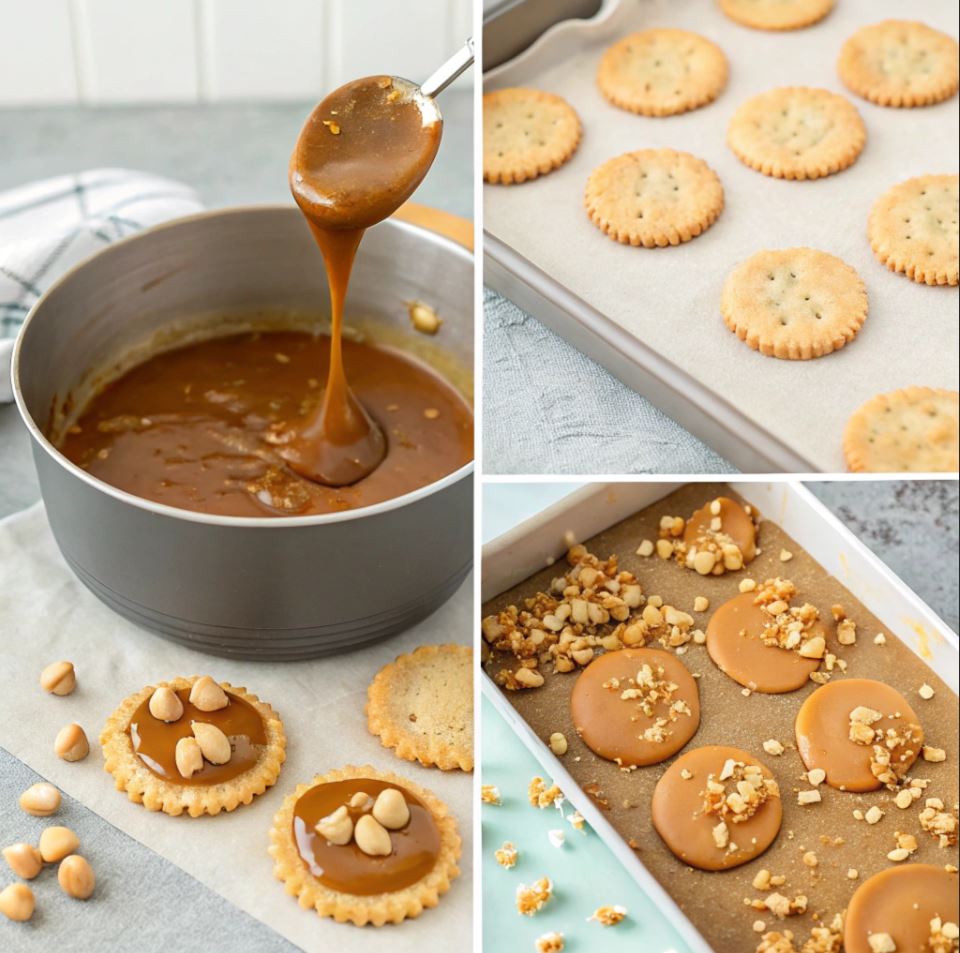
Before you even touch a saucepan, make sure your kitchen is ready for action. Start by lining a cookie sheet with parchment paper. This will save you from the dreaded sticky caramel cleanup later.
Next, lay out your Ritz crackers in a single, orderly layer across the sheet. You’ll want them ready before the caramel comes into play because trust me—the caramel won’t wait. It’s like the divas of the kitchen world. You don’t want them sticking where they shouldn’t.
Step 2: Make That Caramel Gold
Now comes the star of the show—caramel! Grab a medium-sized saucepan and combine your sweetened condensed milk, butter, and brown sugar. Keep the heat at medium—too high, and you risk burning it (we definitely don’t want that).
Stir frequently with a wooden spoon or silicone spatula. This is where the caramel takes on its smooth, rich consistency. Don’t take your eyes off it! Caramel is sneaky—it can go from perfect to scorched real quick.
You’ll notice it start to thicken after about 7-8 minutes. That’s your cue! Once you’ve got a luscious, golden caramel sauce, it’s time to lower the heat and take things up a notch.
Adding Flavor, Assembling, and Troubleshooting
Now that your caramel is golden and ready to go, it’s time to elevate it with some flavorful additions and assemble these amazing treats. This is the part where everything comes together—the savory crackers, the nutty crunch, and that luscious caramel. But don’t worry, I’ll also guide you on how to troubleshoot any hiccups you might encounter on the way. Because, hey, even the best of us have kitchen mishaps. Shall we get back to cooking? Alright, let’s get rolling!
Step 3: Flavor Boost—Adding Milk, Vanilla, and Peanuts
At this stage, your caramel should already be shouting, “Look at me, I’m perfect!” But hold on, there’s more to do. Lower the heat to a gentle simmer and whisk in the milk and vanilla extract. Why? Well, the milk helps thin out the caramel, giving it that perfect pourable consistency, while the vanilla adds a warm, sweet-smelling note that just ties the whole flavor profile together.
Now, go ahead and sprinkle in your roughly chopped peanuts. Stir gently to ensure they’re coated in that molten caramel goodness. At this point, the caramel mixture is visually a masterpiece—it’s gooey, golden, and speckled with crunchy little peanut gems. Doesn’t that sound irresistible?
Here’s a fun tip for extra depth of flavor! You could toast your peanuts lightly before adding them to the caramel. Trust me, this small step makes a HUGE difference by bringing out their nutty aroma.
“If you’ve never toasted your nuts, you’re missing out on a simple trick that unlocks flavors you didn’t even know were there!”
Now doesn’t that spark your curiosity?
Step 4: Assemble with Confidence
Alright, we’re moving quickly now because once your caramel is ready, assembly becomes a race against time. The key here is to work fast and steady. Using a cookie scoop or tablespoon, spoon generous dollops of the caramel-peanut mixture onto each Ritz cracker. Think of this like painting individual masterpieces—except your medium is warm, gooey caramel instead of paint.
Be generous with that topping! Each cracker should proudly carry its share of caramel and peanuts. Not too much (you don’t want overflow madness) but just enough to wow whoever takes a bite. Keep going until you’ve used up all your caramel mixture.
By the way, your kitchen should smell absolutely divine right now. Sweet, buttery caramel mixed with the hints of vanilla and peanuts—it’s basically what I imagine heaven smells like.
Pro Hack for Neat Treats
If the caramel starts to harden as you’re working, don’t panic! Just pop the saucepan back on low heat for a minute or two to loosen it up again. Caramel can be a little high-maintenance like that, but it’s easy to fix.
Once all your crackers are topped, give them some space on the baking sheet so they don’t stick together. That caramel might behave like glue when it sets, and we want treats, not caramel clusters!
Troubleshooting Tip
- Caramel Getting Too Thick Too Quickly? It might be overcooked or cooling too fast. A quick splash of warm milk and a whisk on low heat should do the trick.
- Sticky Mess on Hands? Use the back of a spoon dipped in a bit of butter to press the caramel mixture into place. It’ll handle like a dream!
Step 5: Cool it Down
The hardest part? Waiting for these treats to cool. I mean, they look good enough to eat right away, but we need that caramel to set up completely before digging in. Leave them on the lined baking sheet at room temperature, and resist the urge to “test” any (I know, it’s hard).
For faster cooling, you can pop the baking sheet in the fridge for 20-30 minutes. Just remember, chilling too long could make the caramel harder, so keep your eye on the timer.
Once cooled, the treats become firm enough to pick up but still have that soft, chewy feel when you sink your teeth into them. They’ll be crunchy, creamy, and rich all at once—a total flavor explosion.
Troubleshooting Common Problems
Caramel-making can sometimes feel like walking a tightrope, but don’t worry—we’re here to prevent any kitchen mishaps. Here are some common problems and how to tackle them:
Problem 1: Burned Caramel
Burning your caramel can happen in the blink of an eye. Too much heat or not stirring enough can be the culprits. How to fix it? Unfortunately, burnt caramel can’t really be salvaged once it’s overdone—that bitter taste is just there to stay. The best approach is prevention. Keep the heat at medium, stir constantly, and pay close attention once the color starts to deepen. If you’re unsure, err on the side of pulling it off the stove sooner rather than later.
Problem 2: Sticky Fingers and Messy Treats
Caramel can sometimes ooze or stick to every surface it touches. Feeling like your kitchen counter has become a caramel crime scene? Use parchment paper generously, and always coat spoons or scoops with a light layer of butter to prevent sticking.
Problem 3: Too Crunchy or Hard to Bite
If your caramel sets rock-solid instead of chewy, it’s most likely overcooked. Next time, decrease the cooking time by a minute or two and lower the stove’s heat as soon as you see it thicken. Remember, caramel thickens further as it cools, so taking it off the heat just before seems “ready” will result in the perfect softness.
Pro tip: “When in doubt, undercook slightly—because caramel will naturally firm up as it cools. Too soft is better than too hard!”
What’s Next?
Now you’re sitting with a tray full of visually stunning, awesome-smelling Caramel Peanut Ritz Cracker Treats. But this culinary adventure isn’t over yet! Stay tuned for Part 3, where we’ll add finishing touches, explore creative variations, and learn how to serve and store these beauties like a pro.
Serving, Storage, Variations, and Final Thoughts
Bravo! You’ve made it this far, and now your fabulous Caramel Peanut Ritz Cracker Treats are calling your name. They’re golden, sweet, crunchy, and packed with peanut-y goodness. But, before you start devouring them (or sharing them with your eagerly waiting family and friends), there’s still a bit more to explore. Let’s talk about the best ways to serve these treats so they look as good as they taste. Plus, I’ll share tips for storing them longer and some fun ways to mix things up if you’re feeling experimental.
 Serving and Presentation Ideas
When it comes to serving these bite-sized delights, presentation is key. After all, you eat with your eyes first, right? Here are some creative ways to make your treats pop at any event!
Eye-Catching Displays
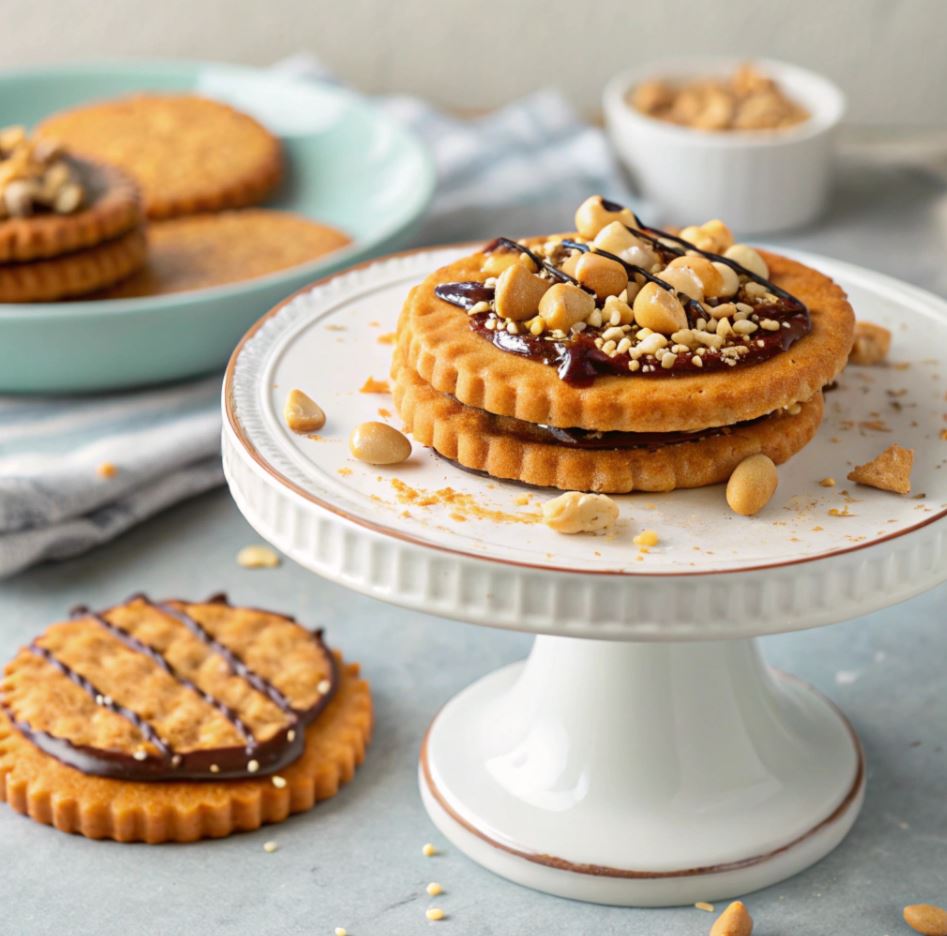
Forget about tossing them onto a plate—these little beauties deserve their own stage. Place them on a colorful platter or tiered cake stand to add height and visual appeal. Sprinkle a handful of peanuts or crushed Ritz crackers around the tray for that extra oomph.
If you’re hosting a holiday party or themed event, match the display to the occasion! For instance, use a red and green platter for Christmas or a pastel dish for a spring baby shower. It’s these small details that leave a big impression.
Perfect Pairings
Want to really wow your guests? Pair these caramel wonders with other sweet-and-salty snacks. Imagine them next to chocolate-covered pretzels, miniature cheesecakes, or bowls of salted caramel popcorn. Not only does this create a diverse snack table, but it also ensures there’s something for every palate.
Oh, and don’t forget beverages! A glass of milk or a strong cup of coffee is an excellent match for the rich caramel flavors. You’re creating a snack experience, not just a nibble, folks.
“Pairing snacks thoughtfully isn’t just good hosting—it’s a culinary performance. Be the snack curator your party deserves!”
Sizes and Shapes
Feel like going the extra mile? Cut each Ritz cracker into fun shapes using small cookie cutters before topping them with caramel. Stars, hearts, or even seasonal shapes like pumpkins for fall can take these treats to Instagram-worthy levels of cuteness.
Storage and Shelf Life
These treats are so delicious, they rarely last long enough to worry about storage! But if you somehow manage to have leftovers (yeah, right), knowing how to keep them fresh is key.
Room Temperature
For short-term storage (up to a week), place your treats in an airtight container and leave them on the countertop at room temperature. Be sure to layer parchment or wax paper between them so they don’t stick together. The caramel holds its texture beautifully this way.
Refrigeration
Planning to keep them longer? Pop them in the fridge instead. Stored correctly, they’ll stay fresh for up to two weeks. However, be aware that chilling them might harden the caramel slightly. No problem, though—just take them out 10–15 minutes before eating, and they’ll be back to their chewy glory in no time.
Freezing
Want to plan ahead for a big event? These treats freeze surprisingly well. Start by placing them on a baking sheet in the freezer for an hour to “flash freeze”; once they’re solid, transfer them to a freezer-safe container or bag. They’ll keep for up to 3 months. When you’re ready to enjoy them, just thaw them in the fridge overnight or at room temperature for a couple of hours.
Fun Variations to Customize Your Treats
Feeling creative? These caramel peanut Ritz cracker Treats are already amazing, but there’s always room for a little twist. Why not put your own spin on them?
Chocolate Drizzle or Dipping
Take these treats up a notch by adding a chocolate drizzle on top. Melt some semi-sweet, milk, or even white chocolate and use a fork to create pretty streaks over the caramel layer. Want to go all in? Dip half of each cracker into the melted chocolate for an even more decadent touch.
Seasonal Spices
Give your caramel mixture a little seasonal flair by adding a pinch of cinnamon, nutmeg, or even pumpkin spice. These simple additions are perfect for Thanksgiving dinners or cozy winter get-togethers. Just imagine these paired with a warm mug of apple cider. Yum!
Nuts and Beyond
Peanuts are classic, sure, but why stop there? Try using almonds, pecans, or cashews for a slightly different twist. You can even mix in dried fruit pieces like cranberries or golden raisins for a fruity bite.
Kid-Friendly Sprinkle Fun
Got kids in the house? Turn this cooking session into a family activity by letting them decorate the tops with colorful sprinkles or crushed candy bits. Who can say no to caramel treats with rainbow sprinkles?
More Sweet and Crunchy Delights to Try
If you enjoyed the Caramel Peanut Ritz Cracker Treats, here are some other delightful dessert recipes that will satisfy your cravings and add a little extra sweetness to your day.
- Banana Bread Cookies – A Soft, Chewy Delight: Experience the comforting flavors of banana bread in chewy cookie form, a perfect snack or dessert.
- Nutella Puff Pastry – A Delicious and Easy Treat: Flaky pastry filled with gooey Nutella, delivering a quick and indulgent treat for any occasion.
- Pumpkin Banana Loaf: Enjoy the perfect blend of pumpkin and banana flavors in this moist and satisfying loaf.
- Marshmallow Cookies – A Gooey Sweet Treat: These soft cookies with gooey marshmallow centers are a delightful combination of textures and flavors.
Final Thoughts
These Caramel Peanut Ritz Cracker Treats aren’t just a dessert—they’re an experience. They’re that perfect blend of flavors and textures that keeps you coming back for “just one more.” Whether you’re impressing guests at a party or just treating yourself on a lazy Sunday afternoon, these little bites never disappoint.
And the best part? They’re incredibly adaptable. You can stick to the original recipe for something tried-and-true or get a little adventurous with variations and presentations. Either way, each bite delivers pure joy.
“Every delicious treat has a story, and this one’s narrative is full of sweet, salty, nutty goodness. Trust me, you’ll want this chapter in your recipe book.”
The only question I have for you now is… when are you making these? Gather your ingredients, roll up your sleeves, and treat yourself—you deserve it! Oh, and don’t forget to share your creations (and maybe a bite or two) with your loved ones. Sharing is caring, after all.
Now go forth and create caramel magic. Your kitchen has never smelled (or tasted) better!
Caramel Peanut Ritz Cracker Treats
Ingredients
For the Caramel Peanut Ritz Cracker Treats:
- 1 14 oz can sweetened condensed milk
- 1/3 cup unsalted butter
- 1/3 cup brown sugar
- 3 tablespoons milk
- 1 teaspoon vanilla extract
- 1 cup roughly chopped peanuts
- 1-2 sleeves Ritz crackers
Optional Ingredients:
- 1/2 teaspoon cinnamon for added warmth
- 1/2 cup melted chocolate for drizzling or dipping
- Crushed pretzels for extra crunch
Instructions
- Line a baking sheet with parchment paper and arrange Ritz crackers in a single layer.
- In a medium saucepan over medium heat, combine sweetened condensed milk, butter, and brown sugar.
- Stir constantly for about 7-8 minutes until the caramel thickens and turns a golden color.
- Lower the heat and whisk in milk and vanilla extract for a smooth consistency.
- Stir in chopped peanuts and mix until evenly coated.
- Using a spoon, scoop the caramel-peanut mixture onto each Ritz cracker.
- Let the treats cool at room temperature or refrigerate for 20-30 minutes until set.
- For added flavor, drizzle with melted chocolate before serving.
Notes
To prevent caramel from hardening too much, store at room temperature in an airtight container.
Pair these treats with coffee or milk for a perfect snack.