Who doesn’t love a dessert that’s as stunning to look at as it is delicious to eat? Introducing the Banana-Strawberry Cheesecake Fantasy—a dessert that’s here to steal the show and your heart. Imagine the creamy richness of ripe bananas blending with the juicy sweetness of strawberries, all hugged by a buttery graham cracker crust. It’s a match made in dessert heaven, and it’s easier to make than you think!
Whether you’re a seasoned baker or just testing the waters in your kitchen, this cheesecake is an experience you’ll love creating. Trust me, your taste buds (and your friends and family) are going to thank you!
Table of Contents
Why This Cheesecake Stands Out
Alright, you might be thinking, “Isn’t this just another cheesecake?” Oh, but this one’s different. It’s not your traditional dense New York-style cheesecake or the no-bake kind that melts by the time you serve it. Nope. This Banana-Strawberry Cheesecake Fantasy is the perfect balance of creamy, fruity, and indulgent. It’s got layers of flavor—quite literally—and an airy yet rich texture that’s downright irresistible.
And did I mention it’s gorgeous? The combination of bananas and strawberries adds not just flavor, but an explosion of natural colors. This cheesecake? It’s not just dessert—it’s art on a plate.
Essential Ingredients for Success
To make magic happen, you need the perfect set of ingredients. Don’t worry, there’s nothing overly complicated here. These basics come together to create something extraordinary:
Here’s What You’ll Need:
- Graham Cracker Crumbs (2 cups): This is the base of our cheesecake—a crunchy, buttery layer that holds everything together.
- Unsalted Butter (1/2 cup, melted): Keeps the crust bound and adds a rich flavor.
- Ripe Bananas (3, mashed): These babies are the stars! They bring natural sweetness and a creamy texture to the filling.
- Fresh Strawberries (1½ cups, chopped): Juicy and slightly tart, strawberries are the perfect counterbalance to the bananas.
- Cream Cheese (4 packages, 8 oz each): No cheesecake is complete without this. It’s your creamy canvas for all the flavors!
- Sugar (1½ cups): Sweetness galore, but not too much.
- Eggs (4 large): They give the cheesecake its structure and that smooth, silky finish.
- Sour Cream (1 cup): Adds a little tang and richness to the filling.
- Vanilla Extract (1 tsp): Because every dessert deserves that hint of warmth.
- All-Purpose Flour (1/4 cup): Helps stabilize the filling just enough for that perfect, cohesive slice.
- Lemon Juice (3 tbsp): Enhances the banana flavor and keeps it fresh.
Pro Tip:
“When selecting bananas, go for the ones that are just overripe—those with brown speckles on the peel. They’re sweeter and perfect for baking!” 🍌
Choosing Fresh Produce for Optimal Taste
You may think bananas and strawberries are just, well, bananas and strawberries. But the quality of your fruit plays a huge role in how your cheesecake will taste. Here’s the deal:
- For Bananas: Look for bananas that are slightly overripe—bright yellow with a few brown spots. The riper they are, the sweeter and creamier your cheesecake will turn out.
- For Strawberries: Opt for fresh, plump strawberries. They should have a bright red color and no mushy spots. Bonus points if they smell like summer!
Step-by-Step Guide to Making the Perfect Cheesecake
Now comes the fun part—rolling up your sleeves and actually making this masterpiece. Don’t worry if you’re not a pro baker; I’ll guide you through each step, and by the end of it, you’ll feel like a dessert wizard.
Step 1: Preheat That Oven!
First things first—preheat your oven to 325°F (160°C). This gives you plenty of time to prep while the oven gets to just the right temperature. Also, grease a 9-inch springform pan. Trust me, this small step will save you from the heartbreak of a cheesecake stuck to the pan later.
Step 2: Craft the Crust
To make the base, mix 2 cups of graham cracker crumbs with ½ cup melted butter in a medium-sized bowl. Stir until the crumbs look like moist sand that holds together when pressed. Now, press this mixture firmly onto the bottom of your greased springform pan. Ta-da! You’ve just made a sturdy crust that’s ready to hold layers of creamy, fruity goodness.
Step 3: Mash Those Bananas
Grab your bananas (three of them!) and mash them in a separate bowl. Add the lemon juice to keep them bright and prevent that dreaded browning. You want them smooth, but a few chunks here and there won’t hurt—it keeps the texture fun and unique.
Chef’s Wisdom:
“Think of the bananas here as the heart of your Banana-Strawberry cheesecake—they set the tone for the entire dessert. Treat them with care!”
Step 4: Start the Filling
Now, it’s time for the showstopper—the cheesecake filling! Beat your cream cheese (4 packages) and sugar (1½ cups) in a large bowl until it’s silky smooth. This part is all about patience. You want the mixture to be super creamy, free of lumps. Add eggs, one at a time, blending well after each one.
Feeling like a baking champ yet? Hang tight, we’re just getting started!
Why You’ll Fall in Love with This Recipe
What makes this recipe so special? It’s that perfect combo of approachable steps with dessert-shop-worthy results. The textures are divine, the flavors are on point, and the satisfaction of pulling this golden beauty out of your oven? Unreal. Plus, it’s the kind of dessert that works for every occasion—birthdays, holidays, or just because you felt like having cheesecake on a Tuesday.
Go ahead, grab those ingredients, and get ready for some baking magic. This isn’t just a dessert—it’s an experience you’ll come back to time and time again.
“Good desserts are worth the time. Great desserts? They’re worth breaking all the rules for.”
Step 5: Getting That Filling Just Right
Now that your cream cheese and sugar are whipped to creamy perfection, it’s time to level things up. Add 1 cup of sour cream, 1 teaspoon of vanilla extract, and ¼ cup of all-purpose flour to the mixture. This combo will give your cheesecake that silky, luxurious texture that melts in your mouth. Stir until everything is smooth and perfectly blended—this should remind you of the consistency of whipped butter, airy but rich.
Here’s where things start to get exciting—gently fold in your mashed banana mixture and those sweet, juicy chopped strawberries (1½ cups). Be careful not to overmix here; you want to keep the filling light and fluffy while ensuring the fruit is evenly distributed. Think of it like tucking little flavor treasures into a creamy cloud.
Step 6: Into the Crust It Goes
Now comes the moment your crust has been waiting for! Carefully pour the filling into the prepared graham cracker base. Use a spatula to smooth out the top, ensuring you have an even layer. The filling should look inviting, like a blank canvas waiting for artistry to unfold.
Take a step back and admire your work for a second. Doesn’t it already look like something you’d see in a magazine?
Step 7: Bake It to Perfection
Alright, this is where the magic happens. Place your cheesecake in the preheated 325°F (160°C) oven and bake it for about 60-70 minutes. Here’s the trick—you’ll know it’s ready when the edges are set, but the center still has a slight jiggle. Jiggle? Yup, that’s right! Think of it like the soft wobble of Jell-O—it’s a sure sign your cheesecake will be creamy and dreamy.
While it’s baking, take a moment to clean up the kitchen or, better yet, take a coffee break.
“Patience is the secret ingredient for a perfect cheesecake! Don’t rush it, and remember, it’s okay if the center wobbles—time and cooling will do the rest.”
Baking Hack:
To prevent your cheesecake from cracking (the ultimate cheesecake nemesis), bake it in a water bath. Wrap the outside of your springform pan with aluminum foil to protect it, and place the pan in a larger dish filled with hot water. The steam from the water keeps the oven environment moist, which your cheesecake will thank you for.
Step 8: Slow and Steady Cooling
Here’s the part where a lot of people go wrong—cooling. Don’t just yank that cheesecake out of the oven and stick it on the counter. Instead, turn off the oven, crack the door slightly, and leave the cheesecake inside for 1 hour. This gradual cooling helps prevent those pesky cracks from forming on the top.
Once it’s done hanging out in the oven, transfer your cheesecake to a wire rack to cool completely. After that, wrap it up and pop it in the fridge for at least 4 hours, or better yet, overnight. (Cheesecake is like wine—it gets better with age!)
Step 9: Time to Serve and Wow Your Guests
Now for the grand finale! Take your chilled cheesecake out of the fridge and prepare to slice into a piece of dessert heaven.
Pro Serving Tips:
- Dip your knife in hot water before slicing, and wipe it clean after each cut. This helps you get those bakery-perfect slices every time.
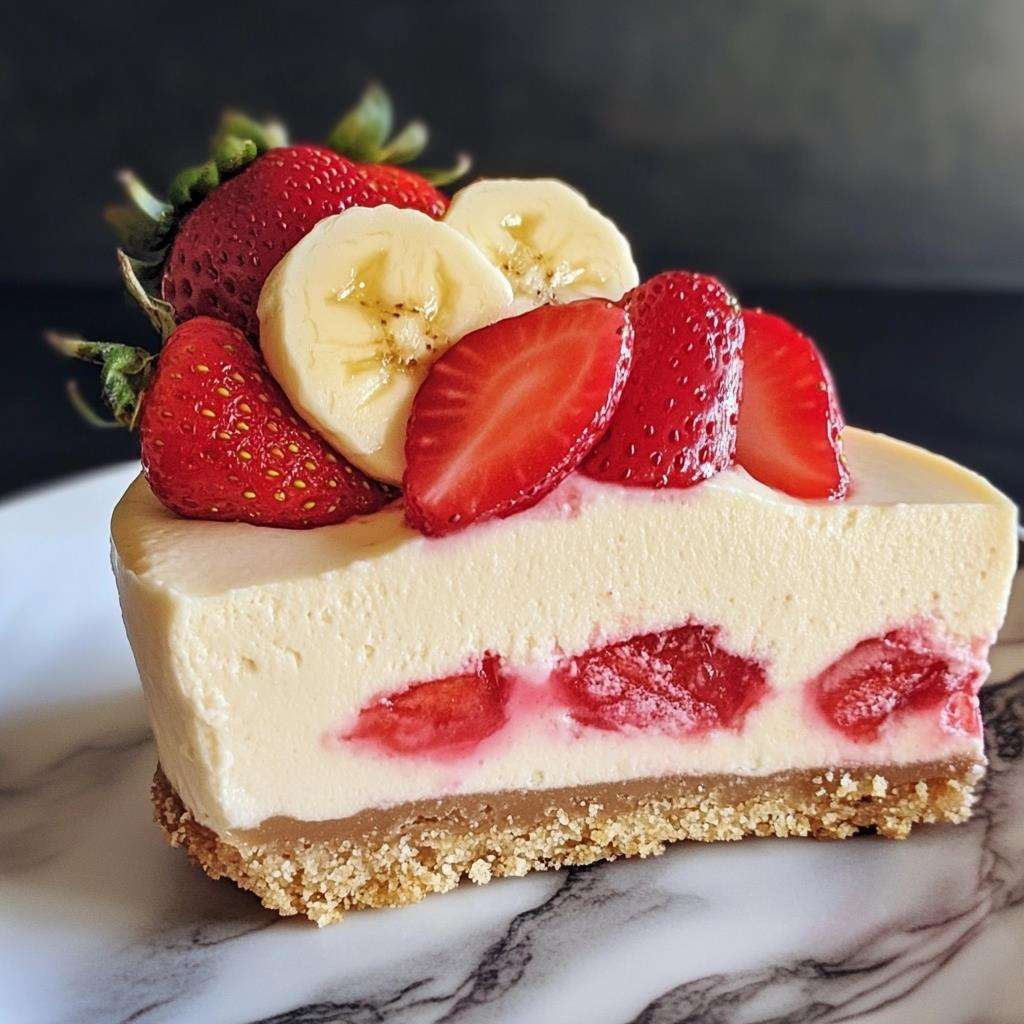
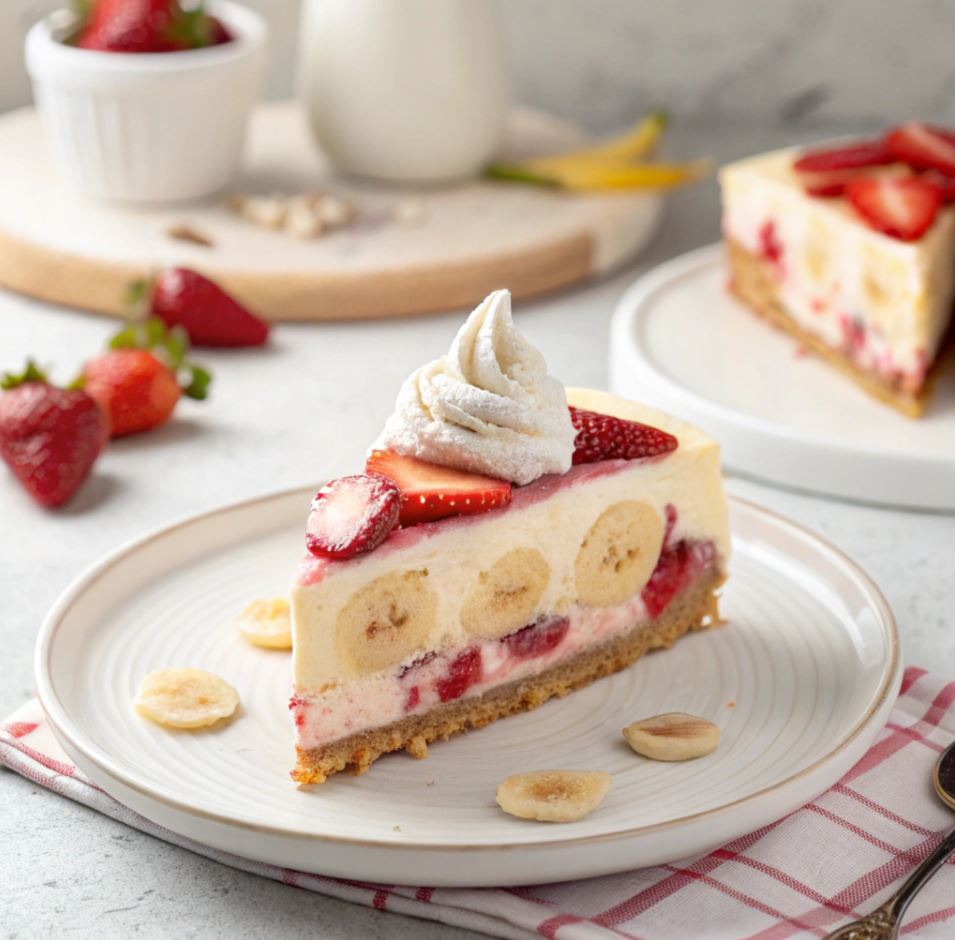
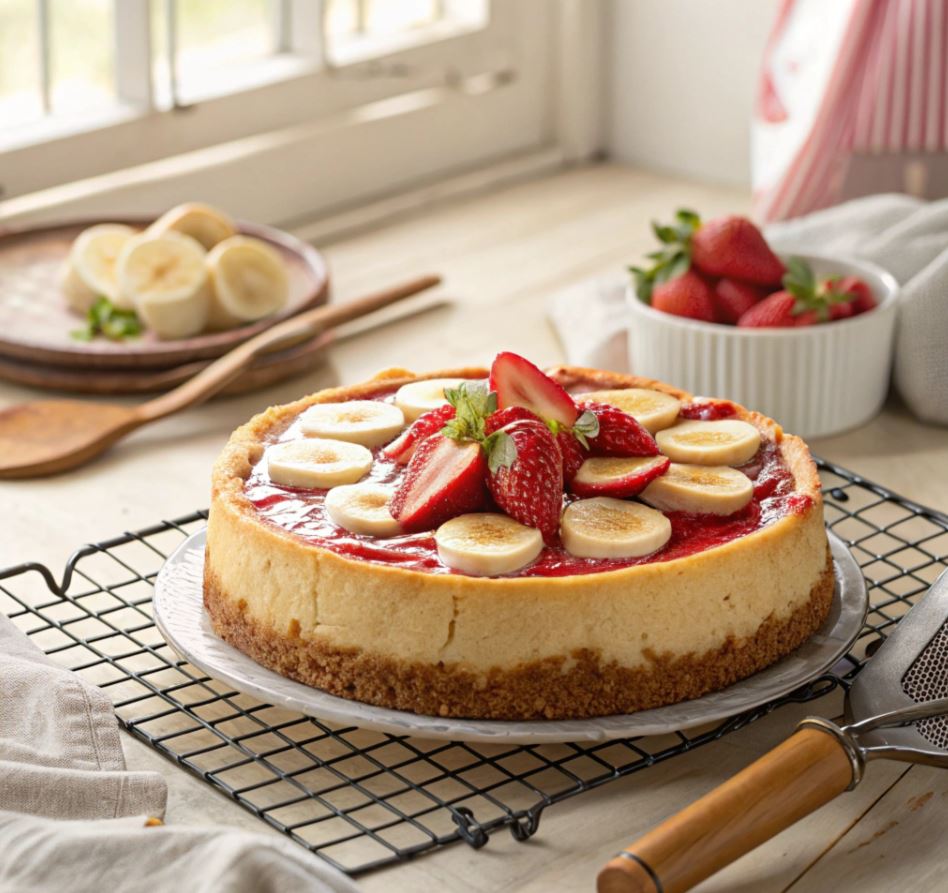
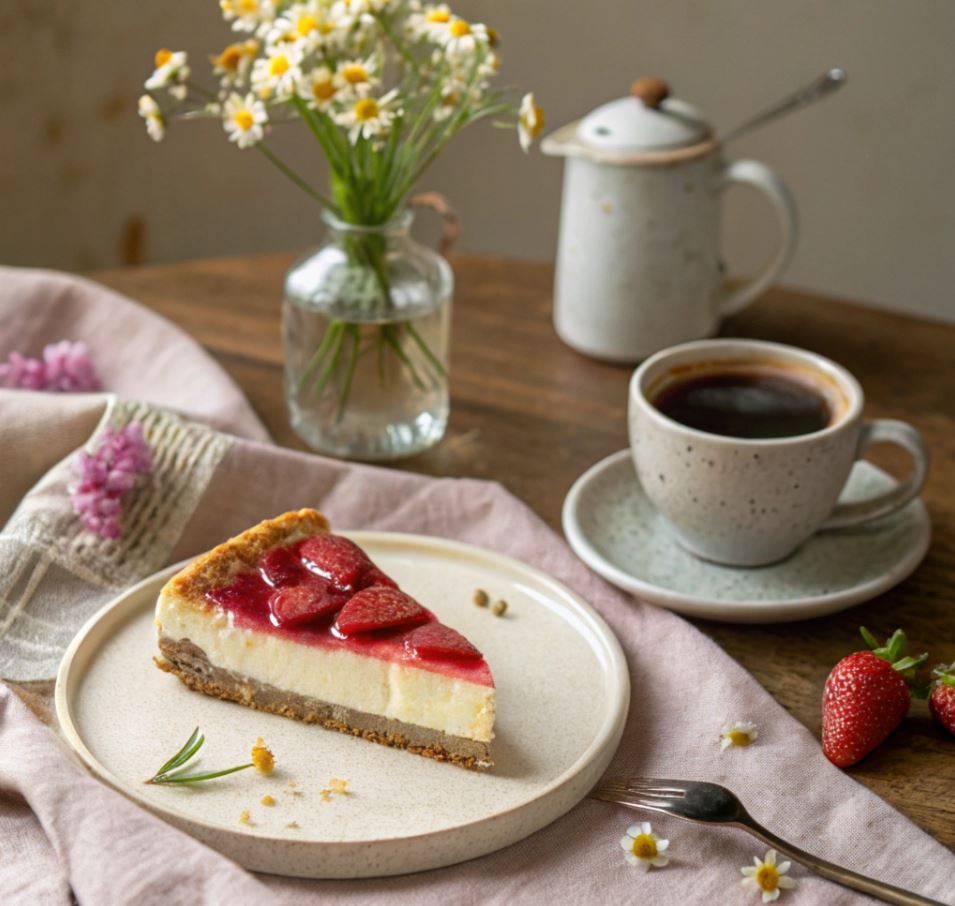
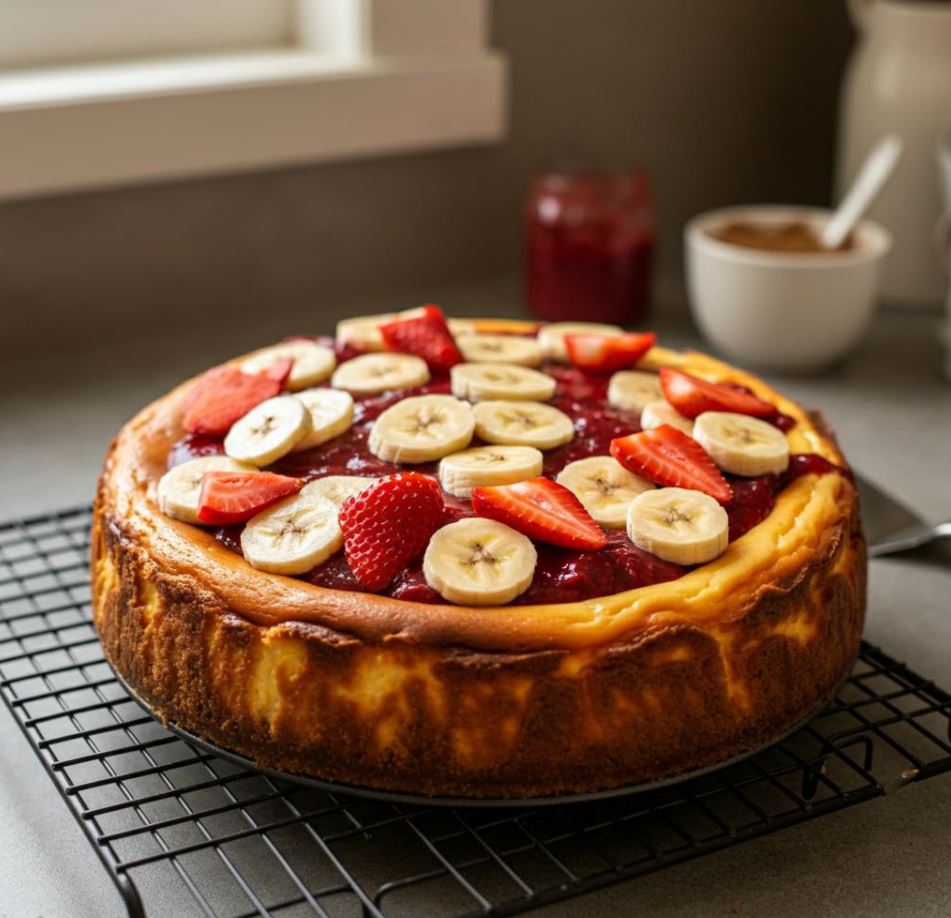
- Garnish your cheesecake with fresh strawberry slices and banana wheels. For extra flair, drizzle some strawberry sauce or a touch of melted chocolate over the top. (Hello, fancy!)
Serving this is your mic-drop moment. Whether it’s for a birthday, family dinner, or “just because,” everyone at the table will be in awe (and probably lining up for seconds).
Why Cooling and Serving Matter
You might think, “Can’t I just eat it now?” Oh, I feel you. The smell filling your kitchen is downright irresistible. But trust me, the fridge time is essential! The flavors meld together perfectly, and the texture becomes just the right kind of firm and creamy.
“Great cheesecake isn’t a sprint—it’s a marathon. The wait might test your patience, but the reward? Totally worth it.”
And hey, isn’t part of the joy watching everyone’s face light up as they take that first bite? It’s moments like this that make all the mixin’, bakin’, and chillin’ worthwhile.
Troubleshooting Common Cheesecake Problems
Now, if a few hiccups happen along the way, don’t stress—every baker has been there. Here are some quick fixes to keep things on track:
The Cheesecake Cracked!
It’s not the end of the world if you see a crack on the top. Cover it with some whipped cream or fresh fruit, and no one will complain. Next time, try the water bath method—it works wonders!
The Center Didn’t Set
If your Banana-Strawberry cheesecake’s a little too soft in the middle, no worries. Pop it back in the oven for an additional 10-15 minutes. Remember to watch it closely!
The Batter Was Runny
Make sure you didn’t skip the flour. It acts as a stabilizer, so your filling doesn’t turn into a puddle.
The great thing about cheesecake is how forgiving it is. Even if it’s not “Pinterest perfect,” it’s still cheesecake, which means it’s still delicious!
Garnishing and Presentation
Here’s where your creativity can shine! Banana-Strawberry Cheesecake is a blank canvas for delicious decorations. Feeling fancy? Top it with a mountain of whipped cream and a sprinkle of chocolate shavings. Want to keep it simple? Fresh banana and strawberry slices will do the trick. You could even dust it with powdered sugar for an elegant touch.
And don’t underestimate the power of a pretty serving plate. Something colorful or vintage adds that extra wow factor.
Now that your Banana-Strawberry cheesecake is baked, cooled, and served, the only thing left to do is sit back, take a bite, and cross your fingers that there are leftovers for tomorrow. If you’re looking for another sweet treat, check out our Caramel Peanut Ritz Cracker Treats for a crunchy, caramelized dessert that pairs perfectly with coffee or tea!
Recipe Variations to Try
Are you ready to shake things up and add a twist to this already amazing cheesecake? While the classic Banana-Strawberry combo is a mic-drop dessert on its own, there’s always room for a little creativity in the kitchen. Let’s explore some fun and delicious ways to give this cheesecake a personal touch!
Fruity Alternatives
Not feeling strawberries today? Swap them out for another fruit! How about blueberries or raspberries? They bring a slightly tart flavor that pairs beautifully with the bananas. Or go tropical with some chopped mangoes or even pineapple pieces. It’s like a cheesecake vacation in every bite!
A Chocolatey Makeover
Craving chocolate? (I mean, who doesn’t?) Add ½ cup of mini chocolate chips to the batter for that gooey, chocolatey goodness. You could even drizzle a mix of white and dark chocolate over the chilled cheesecake for dramatic flair. Think banana split vibes but in cheesecake form. Talk about dessert goals!
Crunch It Up
For some texture lovers out there, sprinkle chopped pecans or walnuts on top before you bake the cheesecake. They’ll roast in the oven, adding an extra layer of nutty flavor and crunch to each slice. Or, sprinkle crushed toffee bits on the finished product for a caramelized, melt-in-your-mouth topping.
Swirl It Up
Here’s a showstopper idea—create a strawberry or chocolate swirl in your cheesecake. Before baking, drizzle a thin layer of strawberry puree or melted chocolate on top of the batter. Use a toothpick or skewer to gently swirl it around. Boom—instant fancy bakery vibes.
“Baking is like art therapy; the cheesecake is your canvas, and every swirl, sprinkle, and drizzle makes it uniquely your masterpiece.”
Storage Tips for Cheesecake Perfection
Now that you’ve baked a Banana-Strawberry masterpiece (congrats, by the way ), let’s make sure none of that deliciousness goes to waste. Whether you’re saving leftovers or prepping in advance, storing your cheesecake correctly is key to keeping it tasting fresh and fabulous.
Fridge Storage
Cheesecake loves the cold—it’s like its natural habitat. Cover your cheesecake with plastic wrap or place it in an airtight container, and it’ll last up to 5 days in the refrigerator. Trust me, it gets even better with time as the flavors settle in and meld together.
Freezer Storage
Got too much cheesecake to handle? Don’t fret—you can freeze it! Slice the cheesecake into individual portions, wrap each slice tightly in plastic wrap, and pop them into a freezer-safe container. When you’re ready to indulge, just thaw a piece in the fridge for a few hours. It’ll stay amazing for up to 2 months (if you can wait that long).
Nutritional Insights (Because Balance Is Good)
Alright, so cheesecake isn’t a salad (duh), but it’s good to know what’s in your slice of heaven. Here’s the down-low for one serving (assuming you’re nice and share the whole cheesecake into 12 slices):
- Calories: ~400
- Total Fat: 25g
- Carbs: 45g
- Protein: 6g
Is it indulgent? Sure. But life’s all about balance, right? Besides, this dessert is made with real fruit (hello, bananas and strawberries!), which makes it basically a health food.
Want a Guilt-Free Version?
Looking to lighten things up a bit? No problem! Swap full-fat cream cheese for reduced-fat cream cheese, and use a sugar substitute like stevia. You can even go with Greek yogurt instead of sour cream to cut down on calories while keeping that creamy texture intact. Boom—dessert with fewer calories but still all the flavor.
You May Also Like These Delectable Treats
If you loved the Banana-Strawberry Cheesecake Fantasy, here are more delightful desserts that pair perfectly with your sweet cravings. These recipes are simple, delicious, and guaranteed to impress.
- Banana Bread Cookies – A Soft, Chewy Delight: Enjoy the comforting flavors of banana bread in a soft, chewy cookie form – perfect for a quick treat.
- Pumpkin Banana Loaf: A moist and flavorful loaf that combines pumpkin and banana – a seasonal favorite that works year-round.
Final Thoughts on the Banana-Strawberry Cheesecake Fantasy
Okay, if you’ve made it this far, hats off to you because you’re now ready to create the cheesecake of dreams. From its creamy, fruity filling to its buttery crust and fresh topping, this dessert is everything you could want—and more.
Honestly, making this Banana-Strawberry Cheesecake is like giving yourself a high-five in the kitchen. The recipe is straightforward, but the results look like you’ve spent hours channeling your inner pastry chef. And the taste? Oh, it’s the kind of dessert that makes you close your eyes with every bite and forget about everything else.
Why You’ll Want to Bake It Again (and Again, and Again)
- Wow Factor: This cheesecake is a showstopper on any table.
- Made for Sharing: Share it with friends, family, coworkers—watch as their eyes light up after the first bite.
- Customizable: Feeling creative or bored? Switch up the fruits, add chocolate, or play with toppings. Endless possibilities!
- Memorable: There’s a bit of magic in serving a dessert that feels truly special. Memories are made over cheesecake slices, trust me.
“Baking is love made visible. And when that love comes in the form of cheesecake? Well, it doesn’t get much better than that.”
Now, go grab that springform pan, channel your inner cheesecake wizard, and get baking! And hey, don’t forget to take a picture of your masterpiece before the first slice disappears—it deserves a spot in your hall of fame.
Happy baking!
Banana-Strawberry Cheesecake Fantasy
Ingredients
For the Crust:
- 2 cups graham cracker crumbs
- 1/2 cup unsalted butter melted
- For the Cheesecake Filling:
- 3 ripe bananas mashed
- 1 1/2 cups fresh strawberries chopped
- 4 packages 8 oz each cream cheese, softened
- 1 1/2 cups granulated sugar
- 4 large eggs
- 1 cup sour cream
- 1 teaspoon vanilla extract
- 1/4 cup all-purpose flour
- 3 tablespoons lemon juice
Optional Ingredients:
- 1/2 teaspoon cinnamon for added warmth
- 1/2 cup white chocolate chips for extra richness
- Whipped cream for garnish
Instructions
- Preheat the oven to 325°F (160°C). Grease a 9-inch springform pan.
- Mix graham cracker crumbs with melted butter until combined, then press the mixture firmly into the bottom of the pan to form the crust.
- Mash bananas in a bowl and mix with lemon juice to prevent browning.
- In a large mixing bowl, beat cream cheese and sugar until smooth and creamy.
- Add eggs one at a time, mixing well after each addition.
- Stir in sour cream, vanilla extract, and flour until fully incorporated.
- Gently fold in the mashed bananas and chopped strawberries.
- Pour the batter over the prepared crust and smooth the top with a spatula.
- Bake for 60-70 minutes, or until the edges are set but the center still has a slight jiggle.
- Turn off the oven and let the cheesecake cool inside for 1 hour before transferring it to a wire rack.
- Refrigerate for at least 4 hours, or overnight, before serving.
- Garnish with whipped cream, extra strawberries, or a drizzle of chocolate if desired.
Notes
If fresh strawberries aren’t available, use frozen ones, but thaw and drain them first.
To prevent cracks, use a water bath while baking.